
How to edit text in a screenshot
A screenshot is a picture of an interface, not the interface itself, so its labels and headings can't be typed over like a document. This RetypeWords guide helps you decide whether to recapture or edit, prepare the screenshot, replace the text, and check for misaligned baselines, broken button outlines, changed icons and smudged small print.
Recapture, edit the layer, or edit the image?
| Your situation | Best option | Why |
|---|---|---|
| You can still open the app or website and change the text (or a test account shows the new name) | Update it there and take a new screenshot | The interface renders the real font, spacing and layout — nothing to match by eye |
| The screenshot lives in a design or documentation file where the text is a separate layer or annotation | Edit that text layer directly | You're changing real text, not pixels |
| You only have the flat image — an old tutorial, a capture from someone else, a version that no longer exists | Edit the text in the image itself | A way to update the captured text when the original interface is unavailable |
Editing the screenshot changes the picture only; it doesn't change the app or its data. If the screenshot will appear in documentation people rely on, make sure the edited wording reflects the real interface.
Prepare your screenshot
- Start with the original capture. Messaging apps and some upload tools compress and resize images; use the file straight from the device if you can.
- Keep it at its original size. Scaling a screenshot up doesn't restore detail — it only makes the existing blur bigger.
- Know the exact wording. Write down the current text and the new text for every label you'll change, matching capitalization and punctuation.
- Look at the neighbors. Note the icons, button outlines, dividers and small captions next to each label; these are what you'll check afterward.
- Keep the new wording close in length. A label that's much longer may need to wrap or shrink, which is easy to spot in a tidy interface.
Capture ready? Open the Screenshot Text Editor Tool and paste it into RetypeWords with Ctrl+V / Cmd+V.
Walkthrough: replacing a label in a screenshot
- Upload the screenshot to RetypeWords on the screenshot editing page (PNG, JPG or WebP, up to 10 MB).
- Zoom in on the label. Interface text is often small. Check that the exact label you want has its own box, and that neighboring labels aren't included in it. Use Select individual words when available if a box spans more than you need.
- Correct the scan. Make Original Text (Detected) match the screenshot exactly — interface fonts make it easy to confuse I, l and 1. If the label has no box, open Edit Scan Results, choose Draw Missing Box, type the original text, then Save & Update. If whole words are missing, pick the screenshot's language under Image language and choose Rescan text.
- Type the new label and choose ADD. Add any other labels in the same screenshot, then check the Pending List contains only what you meant to change.
- Generate — RetypeWords processes all queued changes together for 1 credit.
- Check the interface using the next section, then download the result.
The archived screenshot example shows a historical change from "Kanban Board" to "Kandown Board". Its description explains the earlier processing method; it does not demonstrate the current workflow.
Not a screenshot? The same steps change the words in any picture with the RetypeWords image text editor.
Check the interface details
An edited screenshot can look right at a glance and wrong up close. Zoom to 100% or more and compare these against the original. The close-ups below come from the sample dashboard edit, where only the heading "Weekly Overview" was changed to "Sales Overview" (left: original, right: result).
Baseline and alignment. Line up the bottom of the new letters with neighboring text in the same row. A label that sits a few pixels higher or lower, or starts at a different left edge, stands out in an otherwise orderly interface. If it's off: retry within the task if attempts remain and the saved wording is correct. If you want shorter wording, prepare a new task.

In the sample, the new heading starts at the same left edge and the subtitle is unchanged; both lines sit about a pixel higher than in the original.
Control borders. Follow the outline of any button, tab or input that contains the label. Look for gaps, thickened corners or a border that now runs through a letter. If it's broken: check whether the replacement fits the control. If it does, retry if attempts remain or recapture from the source. If the wording needs shortening, prepare a new task.
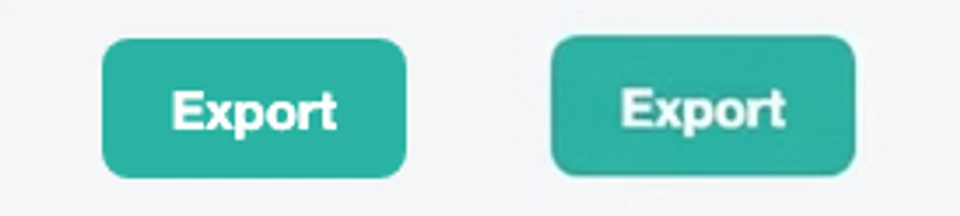
The Export button wasn't part of the edit. Its outline and corners held, but the label is slightly softer and the button sits about a pixel higher.
Icons. Check the icon next to the label and the icons elsewhere in the same row or toolbar — shapes, color and alignment. If one changed: note whether it matters for your use; if it does, retry if attempts remain or consider recapturing.

The square logo and the name beside it kept their shape and color; their edges are a little softer after the redraw.
Small text. Read captions, timestamps, table cells and counters near the edit, even though you didn't change them. If something smudged or changed: compare with the original first. Use a sharper source if it is already unclear; if the change appeared only in the result, retry if attempts remain or edit the source.

Every table cell still reads the same. The rows moved up by about a pixel and the letters are slightly less crisp — small differences you would only catch by comparing.
The whole screenshot. Finally, flip between the full original and the full result. Changes in sharpness, color or an element you weren't watching are easiest to spot this way. RetypeWords flags changes it detects in other text, but detection isn't perfect.
Troubleshooting screenshot edits
| What you see | What to check | Next step |
|---|---|---|
| The label isn't detected | Is it readable at full size? Does the scan language match the image? | Rescan using the image's language, or add a missing box in Edit Scan Results |
| One box covers several labels | Is a full line selected? | Use Select individual words when available. Before adding a replacement, make sure the box covers only the intended text |
| The new label overflows its button | Compare the new wording with the space available | Prepare a new task with shorter wording, or update the source interface and recapture |
| The new text looks blurrier than its neighbors | Compare the original capture with the result at the same scale | If the source is blurry, use a sharper capture. If only the result is blurry, retry if attempts remain or recapture from the source |
| Nearby icons or small text changed | Compare the full image, including areas outside the edit | Retry if attempts remain; for details that must remain exact, recapture or edit the source |
| The font weight differs | Compare the letters with neighboring labels | Review whether the difference is acceptable; use the source interface for precise type and layout |
If the task has attempts remaining, retrying with its saved input does not use another credit. Changing the wording or selection requires a new task, with a new generation charge.
Next steps
Have the original capture and the new labels ready.
How do I remove text from a screenshot? Use the text remover, select Remove text, choose the words and add each removal to the Pending List. Check the repaired background and nearby interface elements before downloading.
Ready to try it on your own capture? Open the Screenshot Text Editor Tool.